In this article
What does a great fat loss workout look like?
Well, there are 5 crucial parts to a fat loss workout that will take an ordinary fat loss workout and make it extraordinary. That’s what I’m going to share with you in this article.
To be clear, the goal of this fat loss workout is to burn the most number of calories during (and after) the workout.
I’m also a proponent of less intense metabolic workouts, meaning workouts that focus on building strength and muscle for long term metabolism improvements, but this specific fat burning workout will also be geared to immediate results, if that makes sense.
What a Great Fat Loss Workout Should Look Like
Part 1: Light Aerobic Warm-Up
Every workout needs to start with activity that will raise your core temperature and make your muscles more elastic for the coming workout. Doing some light jogging, biking, or anything else that increases your heart rate/temperature is what you need to start with.
Otherwise, getting into your workout with cold muscles is like stretching an elastic band that you’ve just pulled out of the freezer. I’ll let you figure out what happens there.
Your light aerobic/cardio warm-up can last 5-10 minutes and should be done at your “talk test pace”, which is a pace/intensity where you can hear your breathing but are still able to maintain a conversation. So, no “huffing and puffing” yet. At its completion, your body should feel warmer and you might even have a little bit of sweat going on.
Part 2: Dynamic Warm-Up
Now that your body is warm it’s time to work out the kinks, dust off the cobwebs, and loosen up that stiff connective tissue and get your muscles and joints used to the ranges of motions and movement patterns you’ll be encountering during the workout.
At this stage, the goal isn’t to stretch those tight hamstrings (or other muscles) but rather to self-massage to make your body more supple (ie. foam rolling), which is then followed by going through movements that will progressively loosen your muscles and lubricate your joints (ie. dynamic exercises). In total, this part might take you 5 minutes at most (or longer if you want).
Let’s look at each of the 2 steps within the dynamic warm-up and see why they’re so important…
Foam Rolling (Self-Massage)
When your body has chronic tightness, tension, or an area with a history of injury or overuse, adhesions usually form in the muscles, tendons, and ligaments. These adhesions can block circulation and cause pain, inflammation, and limited mobility.
This is known as the cumulative injury cycle (or cumulative trauma disorder). It means that a repetitive effort such as sitting or lifting a weight causes certain muscles to tighten.
But here’s the dilemma: A tight muscle tends to weaken, and a weak muscle tends to tighten. This creates a vicious cycle.
As a result of weak and tight tissues, internal forces arise. Friction, pressure, or tension can be present at the same time, which then reduces blood flow to the area.
With less circulation, less oxygen comes to the tissue, causing fibrosis and adhesions to occur in the affected tissues. Eventually, a tear or injury occurs, and this restarts the adhesion process.
That’s why lifting the groceries out of the car didn’t tweak your back. It was likely the years of sitting that created weak and tense tissues that were just waiting to snap.
Stretching does nothing to alleviate this. However, deep-tissue work – like foam rolling – does. It’s simply the act of physically breaking down these adhesions, usually by applying direct deep pressure or friction to the muscles.
As these adhesions are broken down by deep-tissue work, blood flow and lymph flow to the affected area are enhanced.
So for starters, I would suggest rolling out your back and legs since that where most people’s limitations reside.
[Related: 5 Unusual Foam Roller Exercises to Try]
Dynamic Exercises
Dynamic exercises are nothing more than various movements to prepare your body for the workout ahead. Instead of holding a static stretch, here you’ll simply take your limbs/body through a movement that lengthens a set of muscles in a more helpful manner that will better prepare you for your exercises.
[Related: 12 Crucial Dynamic Warm-up Exercises to Do Before Your Workout]
Examples of dynamic warm-up movements include lunge walks, inch worms, push-ups, leg swings, and pretty much any other bodyweight movement that incorporates a certain degree of flexibility, strength, and range of motion.
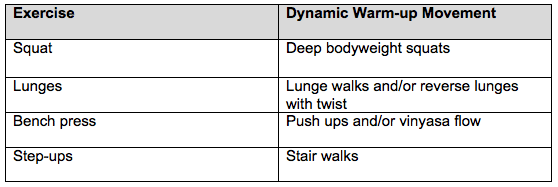
To help this sink in, here are few workout moves and dynamic exercises associated for each one. Note that these do not replace a warm-up set (if lifting heavier weights).
Notice how each dynamic movement is simply a bodyweight version of its strength-based counterpart. At a basic level, that’s as simple as it needs to be.
I would challenge you to increase your range of motion in your warm-up so there are no surprises during the workout. That’s why I recommend doing deep bodyweight squats (bum to ground) during your warm-up even if you’re not going all that way down with weight during the workout.
Part 3: The Fat Loss Workout
At this point, you should be fired up and ready to go. Your body is warm, your muscles are primed, and you’re feeling good.
Note…
When fat loss is the goal, your workouts should involve BIG movements that recruit a lot of muscle.
Here’s why:
- Muscle requires oxygen in order to produce energy…
- It generates heat (ie. burns calories) as a by-product of this energy production process – that’s why you’ll feel your body getting warmer if you’re doing things properly…
- Thus, the more muscle you involve in an exercise, the more oxygen is needed, and the more calories you burn…
- As a result, you start huffing and puffing as your body sucks in more oxygen to meet the demand of the activity.
Fat loss 101 – there you go!
If you do a biceps curl, do you feel anything happening in your body (other than your biceps)? Are you huffing and puffing? No and no. That’s why isolated small movements do nothing to burn fat.
So, big movements with heavier weights (because more weight means more muscle required to lift the weight = more oxygen needed = more calories burned) should be the name of the game for a good fat loss workout.
Next, you should also reduce your rest periods as much as possible. These workouts are very “metabolic”, meaning your muscles might be burning and your heart will probably feel like it’s going to jump out of your chest. By reducing your recovery time, you give yourself both a cardio and strength training effect at the same time.
These workouts might feel uncomfortable but they should make up about 50% of any fat loss program. Other workouts (that I’ll discuss in the future) should be focused on building strength and helping your body recover properly.
For the purposes of this fat loss workout, here’s a sample workout to help you scorch fat, in no time.
Sample Fat Loss Workout:
Complete 8 reps of each exercise with little to no rest in between each. Once all 4 exercises are done, repeat for a total of 4 sets. Again, minimize the rest as much as you can do for best results.
1. DB Front Squats
2. Pull-ups
3. DB Cleans
4. Renegade Row Push-Ups
Here’s the “ghetto” video for this workout. Don’t judge (it was filmed a few years ago)!
Part 4: Workout Finisher OR Short Interval Training
In most cases, we’d throw in the towel at this point.
But today is different…
We’re going to take our workout to another level by “icing the cake” with a workout finisher or interval training. Since I’ve discussed interval training in great detail before, we’ll focus on the former this time around.
A workout finisher is usually a series bodyweight cardio-based exercises packed together to leave you huffing and puffing and your body primed to burn even more fat for hours after your workout is done.
Fat Loss Workout Finisher (it’s challenging):
- Burpee/Chin-up Combo (8 reps), rest 40 secs
- Burpee/Chin-up Combo (7 reps), rest 40 secs
- Burpee Chin-up Combo (6 reps), rest 30 secs
- Burpee Chin-up Combo (5 reps), rest 30 secs
- Burpee Chin-up Combo (4 reps), rest 20 secs
- Burpee Chin-up Combo (3 reps), rest 20 secs
- Burpee Chin-up Combo (2 reps), rest 10 secs
- Burpee Chin-up Combo (1 reps), smile or cry – whichever you feel is most appropriate 🙂
Part 5: Cool Down, Light Stretching & Foam Rolling
A common mistake many exercisers make is spending TOO much time stretching after their workouts (and before them). But here’s the reason you don’t want to overdue the stretching after having crushed your muscles during the previous workout….
When you exercise, you are essentially damaging your muscle fibers. At a microscopic level this looks like small “tears” in the muscle fibrils. But don’t worry, this is normal and it’s how your muscles get stronger once they repair the damage.
However, if you consider these small tears, would it make sense to spend a lot of time further stretching (or tearing) your muscles at this point? No, probably not.
So instead, after your workout, spend 5-10 minutes to cool your body down by walking or other types of light movement.
Then, spend a few minutes to lightly stretch any muscles that were heavily activated during your workout. For instance, if you did a lot of leg work (like in the workout above), then some light hip flexor and hamstring stretches (5-10 second holds) might be warranted.
But perhaps more importantly, especially in workouts where you work up a serious muscle burn, foam rolling is more appropriate after your cool down. Rolling out your tight muscles over a foam roller can help them flush out built up toxins, reduce soreness, help them recover a little faster.
A 2014 study in the Journal of Strength & Conditioning Research investigated whether foam rolling before athletic performance tests could help reduce post-exercise fatigue and soreness. The researchers found post-exercise fatigue after foam rolling was significantly less than in those subjects who did not do foam rolling before the athletic tests. (1)
In another study, researchers concluded that foam rolling after a squat workout was beneficial in decreasing muscle soreness while improving vertical jump height, muscle activation, and passive and dynamic range of motion in comparison with control the group who did not use foam rolling after their session. (2)
Those are some pretty compelling reasons to get out the foam roller and roll away for a few minutes after your workout, yeah?
Here’s a popular video that shows you how to do this:
So there you go…
The anatomical breakdown of a great fat loss workout. Apply these principles to any of your workouts and you’ll be burning more fat and getting stronger without spending your entire life in the gym.
Enjoy This Article?
Did you enjoy this article on The Anatomy of a Great Fat Loss Workout? You might like to try my Fat Blaster Strength and Interval Cardio Workout. If you want to experience an awesome fat loss workout with me coaching you over your headphones, then click the banner below to get if for FREE.


