
It’s time to forget everything you thought you knew about your abs.
In this article
And I mean everything, including the supposed “fact” that crunches are one of the best exercises for “six-pack abs.”
In fact, go ahead and forget about the idea of the six-pack while you’re at it, because what I’m about to share with you will inevitably lead to the washboard effect anyway (a better, stronger washboard, I might add).
The Truth Behind Your Abs
Here’s why I’m telling you to ditch your preconceived notions about your abs: when you really understand how they function, you’ll see why the conventional way of training them doesn’t work.
For starters, many people believe that great abs result from “prime mover” exercises like crunches, leg raises, etc.
Unfortunately, this belief doesn’t reflect the true function of the abs or the core, which is to stabilize.
You see, your “abs” consist of much more than just your six-pack. In fact, your abdominals should be viewed more globally, including your entire core region: extending from just below your chest all the way down and around to your glutes.
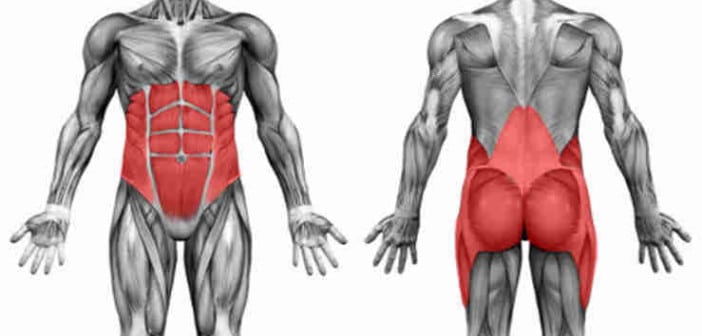
This corset of muscle not only gives people a defined, tight core but also stabilizes the spine and disks, protecting them from unnatural bending or twisting.
What is the pallof press?
The Pallof Press is a fantastic core exercise that works wonders for the muscles that help stabilize your spine. We’re talking about the obliques, transverse abdominis, rectus abdominis, and other deep core muscles. This exercise is designed to improve core strength, and stability, and resist rotational forces, making it an excellent choice for athletes and individuals looking to build a strong and functional core.
Pallof Press Benefits
See why getting a toned, sleek belly involves much more than just working the muscles in the front of your stomach?
To truly tighten up this area, you need to be working the entire core, which includes the deep inner muscles hiding beneath your abs, your obliques, your low back, and upper glute area.When you do this, you’ll notice that your entire trunk region will become tighter – not just the front region of your abdominals.
So how can you even work all of these muscles if “standard” ab exercises aren’t enough? While I have a whole collection of my favorite ab exercises (you can see them all in this post), right now I want to focus on one of the absolute best core exercises – the Pallof press.
How the Pallof the Press Works the Core of Your Core
The beauty of the Pallof press is that it challenges and strengthens the stabilization action of your abs. That’s because when you do this exercise, it forces your core to resist the rotation or compression of your spine, which forces your entire core to engage.
This not only helps you build a sleeker core because you’re working it from every angle but also leads to greater balance and a strong center of power for any type of movement you do on a daily basis.
Want to spend a few hours moving furniture or gardening without worrying about injuring your lower back (plus having a taut tummy to boot)? Spend some time doing the Pallof press.
How It Helps Your Spine
Now that we’re on the subject of back pain and injuries, it’s worth mentioning that the Pallof is superb for preventing and even relieving low-back pain.
The anti-rotation action of the Pallof essentially prevents the spine from being thrown out of its safe position through unnatural twists and bends.
For instance, if you slip or stumble, a strong core will prevent your spine from taking on all of the force and damaging a disk.
The abdominal muscles literally act like body armor for your spine.
This is also the reason crunches and similar movements are terrible for the spine and low back pain. Instead of stabilizing the spine, they actually compress the disks by forcing the spine to bend in an unnatural way.
Before we get started with the Pallof, keep in mind that the more narrow your stance is, the harder the Pallof Press will be. So, if you find yourself struggling with balance at first (and you’re not using too much weight), try widening your stance slightly.
3 Common Mistakes to Avoid When Doing the Pallof the Press
Also, be sure to run through a mental checklist as you set yourself up to do the Pallof Press, avoiding these common mistakes:
- Using too much weight.
- Locking out the knees.
- Not fully extending the arms.
How to do the standard cable pallof press
And now, without further ado, let’s get to shredding that core!
Level: Beginner – Intermediate (Depending on weight used)
The cable Pallof press is the standard version of the Pallof. As far as weight goes, you don’t want to use too much, especially if you’re new to anti-rotation exercises.
Aim for a weight that makes it semi-difficult to stay standing straight, but not so difficult that you’re leaning and shaking to remain stable.
The key here is to focus on bracing your entire core to resist the pull of the cable. Don’t lean to the side or let the cable jerk your arms across your body. Go slow, go controlled.
Performing the Cable Pallof Press:
- Standing parallel to your cable machine, clasp the handle in both hands, palms together. Position yourself a few feet away from the cable to add tension. Make sure your feet are hip-width apart and your knees are just slightly bent.
- Bring the handle up to the center of your chest and press out. Extend your arms fully, noting how your body wants to lean toward the cable. Don’t let it.
- Return your hands to your chest and repeat for 8 to 12 reps on each side.
4 Pallof Press Variations
As if the standard Pallof press’ ab-sculpting powers weren’t enough, it has numerous variations that make it easier, harder, and also that target different parts of your core.
For instance, the vertical Pallof will shift the focus to the front of your core by resisting extension, while the lateral Pallof will further engage those side-sculpting obliques.
1. Half-Kneeling Vertical Pallof Press
Level: Intermediate
This version of the Pallof (as opposed to the tall kneeling version) increases the level of instability, since your stance is staggered. This ups your core engagement and makes maintaining your balance more difficult.
Performing the Half-Kneeling Vertical Pallof Press:
- Begin by grabbing your cable and kneeling in front of your machine, facing away from it. (You should use a split rope to grasp the cable so that it can comfortably press over your head and shoulders.)
- Lift one leg up into a half-kneel (sort of like a low lunge).
- Now, brace your core and press the cable over your head, fully extending your arms. Hold for a beat on the extension.
- Repeat for 8 to 12 reps.
2. Lateral Pallof Press
Level: Intermediate
The lateral press is similar to the half-kneeling press in that you’re creating more instability for your core by kneeling in a split stance. However, by raising your hands overhead, you also engage more of your lower abdominals and also get in some shoulder engagement.
Performing the Lateral Pallof Press:
- Begin by coming into a half kneel parallel to your cable machine. Grasp your cable in both hands at your chest.
- You’ll probably already feel the cable attempting to pull you up and sideways. Resist this by bracing your core and focusing on fully extending your arms directly overhead.
- Lower your hands to your chest and repeat for 8 to 12 reps on each side.
3. Split Stance Pallof Press
Level: Intermediate
The split-stance Pallof seriously challenges your center of balance, requiring the obliques to be fully engaged to keep you upright in your wide stance.
Performing the Split Stance Pallof Press:
- Begin by standing parallel to your cable, grasping it at your chest with both hands.
- Assume a split stance with one leg forward and the other extended behind you. Bend both knees slightly.
- Press the cable out in front of you, making sure you’re standing tall and as still as possible.
- Return your hands to your chest and repeat for 8 to 12 reps on each side.
4. Tall Kneeling Pallof Press
Level: Intermediate
The tall kneeling Pallof (as opposed to the half-kneeling Pallof) requires more oblique engagement to hold you upright, since you’re taking a lot of leg stability out of the equation.
Performing the Tall Kneeling Pallof Press:
- Begin by kneeling parallel to your cable machine, knees hip-width apart. Grasp your cable in both hands at chest level.
- Brace your core, keep your spine straight, and press the cable in front of your chest. Hold for a beat, arms fully extended.
- Return your hands to your chest and repeat for 8 to 10 reps on each side.
4 Pallof Press Alternatives
If you’re unable to get to the nearest gym or cable machine or are just looking for a way to progress into the Pallof, try out these alternatives below.
1. Banded Pallof Press
Level: Beginner
Don’t have access to a gym or cable machine? No worries. The Pallof Press can be done at home with an exercise band and something sturdy to attach it to.
Performing the Banded Pallof Press
- Begin by looping your band around a sturdy object (a strong beam or railing). Stand or kneel at a distance where your band is taut, grasping it in both hands at your chest.
- Press your hands in front of you, keeping them at chest level, bracing your core. Hold for a few seconds, then bring your hands back to your chest.
- Repeat for 8 to 12 reps on both sides.
2. Renegade Row
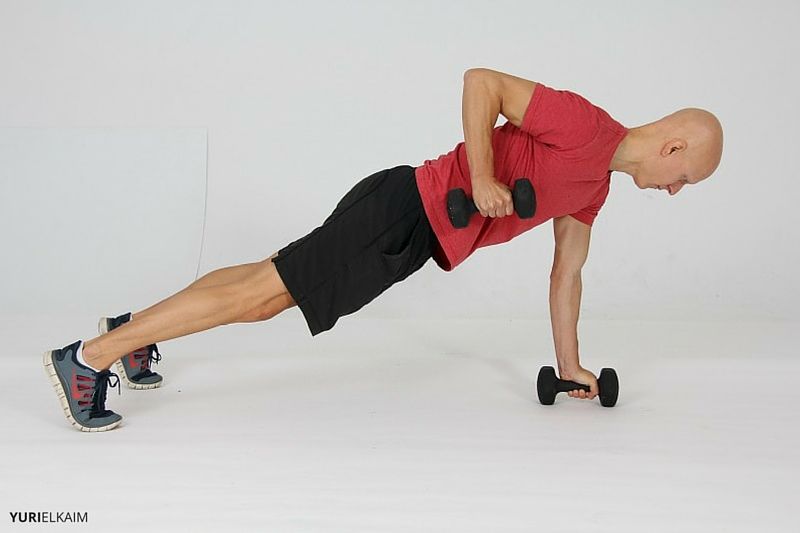
Level: Beginner – Intermediate
While the Renegade Row looks nothing like the Pallof, the way it engages the core is similar.
Both the Renegade and Pallof are anti-rotational exercises that require bracing of your abdominals as you pull weight in an unstable stance. This requires the deep engagement of your oblique stabilizers to avoid falling or rotating to one side.
Performing the Renegade Row:
- Begin by grabbing a challenging dumbbell weight. Come into a plank position, hands directly beneath your shoulders and body in a straight in from head to toe.
- Grasp your dumbbell with your right hand and row, bringing the weight to your lower rib cage/waist area.
- Avoid swaying from side to side or letting your hips drop as you row.
- Repeat for 8 to 12 reps on each side.
3. Anti-Rotation Split Squat with Band
Level: Beginner
This is a great Pallof press progression, as it teaches your core how to start resisting rotation during everyday movement; in this case, the lunge.
Performing the Anti-Rotation Split Squat with Band:
- Begin by looping an exercise band around a sturdy object. Step out until the band is taut and grasp it with both hands.
- Press out with both hands until your arms are fully extended. Hold them here as you step into a lunge.
- Move up and down in a lunge/split squat with your arms extended in front of you for 8 to 10 reps before switching sides.
4. Anti-Rotation Band Squats
Level: Beginner
These banded squats are another great way to progress to the Pallof. They work in a similar fashion as the anti-rotation lunges, training your core to handle anti-rotational resistance.
Performing Anti-Rotation Band Squats:
- Begin by looping an exercise band around a sturdy object. Step out until the band has a bit of tension and grasp it with both hands.
- Press out with both hands until your arms are fully extended. Hold them here as you lower into a squat, making sure your feet are hip-width apart and that your weight is in your heels.
- Avoid leaning forward or to the side as you squat, concentrating on engaging your glutes and core.
- Repeat for 8 to 10 reps on each side.
Tight Abs From Just One Move
The number of ways you can vary and modify the Pallof press is another amazing benefit of this exercise – not to mention the fact that you only need a band and a sturdy object to do it.
Once you start incorporating the Pallof into your weekly core routine, you might also notice balance and stability improvements during other exercises, like walking lunges, due to your increased core strength.
Enjoy it, along with that newly defined core!