
In this article
- Why Push-Ups Are Good for You
- Why Can’t I Do a Push-Up?
- How to Do Push-Ups Correctly
- 2 Different Ways to Do More Push-Ups
- 1a. Beginners: How to Do More Push-Ups by Focusing on Eccentrics
- 1b. Advanced: How to Do More Push-Ups by Focusing on Eccentrics
- 2. “Repping It Out” OR Pushing Through Your Push-Up Barrier
- 12-Week Push-Up Program to Get to 100 Push-Ups
- How to Use This Program
- If You’re More Advanced…
- Want 4 More Cool Ways to Do Your Push-Ups?
- How Can I Do Push-Ups If I Have Sore Wrists?
- Your Body is the Best Equipment
Frequently asked questions (FAQ)
It was blazing hot in Acapulco, Mexico…
I was 22 at the time and on a week-long “spring break” with my buddy.
On the second day, the “festivity director” had a competition by the pool to see who could do the most push-ups.
The reward… nothing other than recognition.
Naturally, I stepped up to the challenge.
There were a number of big, buffed college football players there would did about 40-50. The guy before me did 56 push-ups.
Yet, I was confident I could do more. After all, I had been in training to get “beach ready” for this trip. And push-ups were my bread and butter.
So, I stepped up, got into push-up position, and cranked out 78 push-ups! Yeah baby. I won the competition.
Thirteen years later, even though I had literally forgotten about that event until I started writing this post, push-ups are still my bread and butter. And in this post, I’ll show you my secrets on how to do more push-ups – no matter your where you’re at right now.
Whether you’re trim and lean like me, overweight and want to lose weight, muscle bound, or anywhere in between, the pushup tips you’re going to discover in this post WILL work for you – as long as you follow the plan.
I’ve used these same ideas to turn countless clients over the years – from all walks of life and all age groups – into pushup machines.
Why Push-Ups Are Good for You
Push-ups are easily the best overall pushing movement you can use to strengthen your chest, shoulders, triceps and core. Even better is the fact that you can do them anywhere.

[ How to Strengthen Your Core]
Being able to push your body weight is a great sign of strength and can transfer over into many areas of your life—like getting up off the floor, pushing open a door, and more. From a visual perspective, push-ups are one of the best exercises for building a rock solid chest that commands attention.
Whether you’re a complete beginner or more advanced I’m going to the show you how to do more push-ups in a way that you can see your progress and actually feel stronger each time you do them. But first, let’s cover some basic groundwork.
Why Can’t I Do a Push-Up?
If you’re asking that question, then here’s the simple answer:
Your pushing muscles (chest, triceps) are not strong enough to lift (or lower) your body weight. This can be trained and improved, so don’t worry.
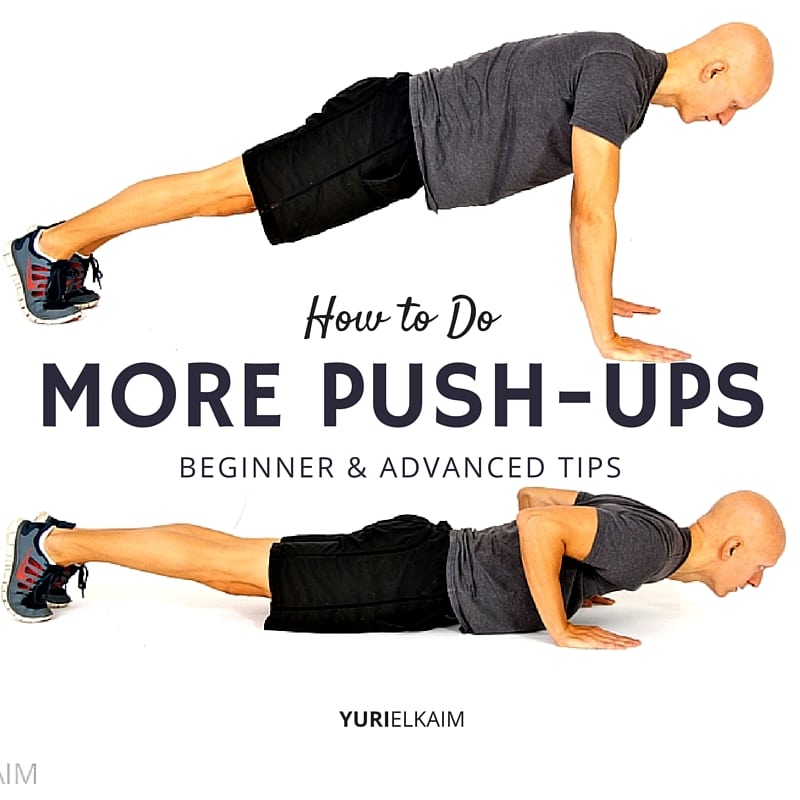
How to Do Push-Ups Correctly
I’ll go into specifics a little further down in this post (depending on your strength level) but a few things to keep in mind are:
- Keep your body in a straight line (bum close to shoulder height)
- Brace your core to connect/stabilize your upper and lower body
- Train the entire range of motion (ie. all the way to the floor)
- Keep your shoulder blades pinched together to better active your chest and protect your shoulders
- Exhale as you push up and inhale as you lower down
2 Different Ways to Do More Push-Ups
There are really 2 ways to do more push-ups…
The first way is to focus on the eccentric (“negative”) phase of the contraction. This is where you simply focus on lowering your body very slowly towards the floor.
The eccentric contraction is defined as active contraction of a muscle while the muscle is lengthening. For instance, in a push-up, when lowering towards the floor. Here, you’re essentially working against gravity and slowing your body from collapsing against gravity’s pull.
The beneficial eccentric phase is also what causes delayed onset muscle soreness (DOMS) about 48 hours after a workout (don’t worry, that doesn’t occur as much after a few sessions). It’s the ultimate stimulus for strength gains so focusing here makes a lot of sense whether you can barely do 1 push-up or you’re looking for a way to challenge yourself to do even more push-ups.
The second training method to do more push-ups is through “repping it out” and proper program design, which I’ll detail for you in a minute.
But first, let’s start with how to do more push-ups by focusing on the eccentric (lowering) phase of the push-up…
1a. Beginners: How to Do More Push-Ups by Focusing on Eccentrics
Phase 1:
Let’s say you can’t do a full push-up from your feet. Sure you could do push-ups from your knees but let me show you a better way to do full push-up (from your feet) using eccentric training.
Here, you’re going to start at the top of the push-up (basically a straight arm plank) and LOWER yourself slowly to the floor very slowly – count 4-6 seconds. Then, rest on the floor for a second, come back to your knees, and back to your starting position.
Repeat for 5 reps.
Yes, this is NOT a full push-up but focusing on the “negative” component of the movement is the best way to strengthen the muscle fibers required to eventually do a full push-up.
Phase 2:
After a few workouts, you should have an easier time lowering yourself all the way to the floor. The next step is to be able to push yourself back up to your starting position. This is the “concentric” phase of the contraction and this can be difficult at first so let’s break it down.
First, start at the floor and push yourself up into a kneeling push-up. Thus, keep your core tight and your body in a straight line from shoulders to your knees and push yourself from the floor to a straight arm position with your knees on the floor. Then, lower slowly (4-6 seconds) and repeat.
Once you can successfully complete 5 reps, you’re ready for Phase 3.
Phase 3:
Here’s where it all comes together. By now, you can lower yourself slowly toward the floor and you can push yourself back up with your knees on the ground.
Now, we’re going to combine everything and do a full push-up from your feet.
First, start at the top of the push-up position with your arms straight (hands just outside shoulder width), core braced, and legs straight so that your toes are the anchor point on the floor.
Now, lower yourself slowly (4-6 seconds) and just before you reach the floor explosively (yet in a controlled fashion) push yourself back up to your starting position.
It’s very important that as you initiate the “push”, your core is tight and your entire body moves in a straight line – not in waves (as is often the case when you can’t do a full push-up).
Congrats, you’ve now done ONE full push-up!
Phase 4:
Now that you can successfully do a push-up with great form, you can continue challenging yourself by building in a few more push-ups each time you workout while still focusing on a very slow eccentric lowering and explosive push back to the top.
In all honesty, this is my preferred way of doing more push-ups because your focus on form (slow lower, explosive push) is going to engage far more muscle fibers than simply cranking through as many push-ups as possible with sub-part form.
1b. Advanced: How to Do More Push-Ups by Focusing on Eccentrics
If you’re like me and you can easily crank out 20, 30, 50 (or more) push-ups without breaking a sweat then let me show you how to do more push-ups (or at least make them more challenging) by focusing on the eccentric contraction (and a few other tweaks).
Similar to the beginner protocol, you’ll want to focus on lowering very slowly (4-6 seconds) but I’d also like you to add the following 2 elements:
Push up as explosively as you can
- this will recruit more muscle fibers (and make you powerful and stronger)
- Keep your elbows tucked into your torso, instead of flared out to the side – this will engage your triceps and chest to a greater degree
An optional addition to your push-ups could also be a weighted vest. Although you won’t be able to do MORE push-ups with extra weight on your torso, this is one of the best ways – when combined with the 3 elements I just mentioned – to increase your pushing strength and develop your chest.
I have a 50 pound weighted vest that I’ll often use when I want to build more “strength” instead of just more reps into my push-up/chest routine. While focusing on the slow/fast tempo and keeping my elbows tucked in, I’m usually only able to crank out 4-6 quality reps instead of my usual 15-20 without the added weight.
Your Eccentric Push-Up Training Plan
Whether you’re following the beginner (assuming you can do a full push-up from knees or feet) or the advanced protocol, you can use this simplified 4-week training plan. Since strength is relative, this is good for all fitness levels, especially if you’re moving with excellent form (or using a weighted vest if you’re more advanced).
“Baseline max reps” = the number of push-ups (partial or full) you’re able to do before starting this training plan.
“+1 (or other number)” = the number of additional push-ups you would add to your baseline max reps to progressively challenge your push-up capability.
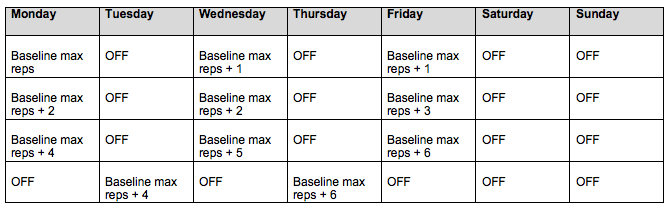
NOTE: Week 4 is a “recovery week”, hence less push-up volume. This week is very important for helping your body bounce back stronger to “super compensate” and move forward without hitting plateaus or injuring yourself in the process.
2. “Repping It Out” OR Pushing Through Your Push-Up Barrier
For many people doing a proper push-up, let alone 100 of them, can be quite difficult.
However, if you want to test your strength endurance and do more push-ups, then this 12-week plan can get you there. In fact, it will help you do 100 consecutive push-ups in just 12 weeks!
The difference with this plan is that you’re less focused on eccentric slowness and just using a consistent and smooth tempo to do the number of push-ups prescribed below.
That being said, I recommend this plan if you’re able to do at least ONE full push-up from your feet. If you’re still struggling with doing a full push-up, then please follow the protocol above to get you there.
You may think that it’s impossible to do 50 or even 100 push-ups but trust me… anyone can do it! All you need is the right program to follow and repetition.
You ready?
12-Week Push-Up Program to Get to 100 Push-Ups
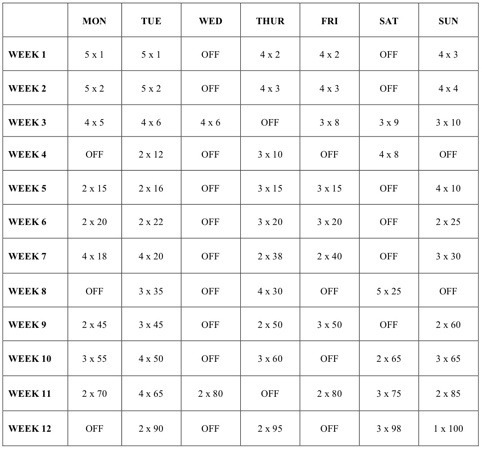
How to Use This Program
In the above 12-week push-up program, each workout is described as “2 x 10″ for instance.
- The first number = # of sets
- The second number = # of reps
In general, the less rest you can take between sets the better, but for the latter weeks where you are doing close to 100 push-ups for a number of sets, you can take up to 5 minutes rest so that you can complete each set to the fullest.
If you cannot complete all reps in one go, then give yourself a few seconds rest and the continue until all reps have been completed.
Again, this program is for someone who can only do 1 push-up from their feet (starting today). It is designed for the absolute beginner. If you follow it though, you will be able to accomplish 100 push-ups at once by the end of 12 weeks.
If You’re More Advanced…
If you can do more than 1 push-up (most likely you can), then simply test yourself right now by doing as many reps as you can. However many you complete, that’s where you’ll want to start in the 12-week program.
For instance, if you can do 50 push-ups at once, then you’ll want to start off at the beginning of Week 9.
From there, simply following the last 4 weeks of the program should get you to 100 push-ups!
Want 4 More Cool Ways to Do Your Push-Ups?
Watch this video and try these push-up variations if you want to spice things up or challenge yourself even further:
How Can I Do Push-Ups If I Have Sore Wrists?
Just before we finish off, I want to answer a very common question I get asked. And if this applies to you as well, then here’s how to do push-ups if you have sore wrists…
The best thing to do is to set up dumbbells as the base of support for your hands. Doing so allows your wrists to stay in a more neutral position as opposed to being hyper-extended in a normal hands-on-floor position.
This picture depicts what I’m talking about:

Your Body is the Best Equipment
Looking for a great do-anywhere workout that will build strength, burn fat, and sculpt your muscles?
Download my FREE Bodyweight Workout. It’s perfect for when you’re traveling, can’t get to the gym, or only have 20 minutes to squeeze in a quick workout.
You can download it right now by clicking the banner below!

Frequently asked questions (FAQ)
How can I increase the number of push-ups I can do?
By progressively challenging yourself, you can boost your push-up capacity. Start with a modified version, such as knee push-ups, and gradually work your way up to standard push-ups. Consistency is key, so aim to practice push-ups regularly and gradually increase the number of repetitions over time.
Are there any specific techniques to improve my push-up form?
To optimize your push-up form, ensure your body is in a straight line from head to toe. Keep your core engaged, maintain a neutral spine, and avoid sagging or arching your back. Place your hands slightly wider than shoulder-width apart and lower yourself with control, aiming to touch your chest to the floor before pushing back up.
Can I incorporate variations into my push-up routine?
Absolutely! Adding variations to your push-up routine can provide additional challenges and target different muscle groups. Try incline push-ups (elevating your hands on an elevated surface), decline push-ups (elevating your feet), diamond push-ups (placing your hands close together in a diamond shape), or plyometric push-ups (explosive push-ups with a clap).