Have you tried hip thrusts yet? Lately they’re topping the list of trendy glute exercises – for good reasons. The hip thrust is primarily a strength training exercise that’s a staple on leg days, targeting strength and muscle development in the glutes.
In this article
While it’s not a new exercise by any means (there are photos of strongmen performing barbell hip thrusts as early as the 1920s), for years they’ve taken a backseat to more popular exercises like the squat, deadlift, and lunges.
While these are all amazing exercises you should include in your workouts, let’s take a look at why this exercise is a must when it comes to maximizing your glute potential.
Benefits Of The Hip Thrust
First of all, the hip thrust uses the gluteus maximus (the upper glute muscle), gluteus medius (the lower glute muscle), the quadriceps, and the hamstrings.
As a bonus, hip thrusts also involve the entire core, including the muscles referred to as “stabilizer” muscles that help us keep our balance and keep our spine stable.
Basically, if you want to take your backside to the next level, you need to be doing hip thrusts.
Whether you’re using them as a main lift with low reps and heavy weight, or as a supplement to heavy deadlifts and squats, hip thrusts have a well-deserved place in your routine because they fire your glute muscles, big-time.
And yes, possibly even better than the squat (not that you should stop squatting, of course!).
Skeptical? A study published in the Journal of Applied Biomechanics followed thirteen trained women performing 10-rep maximum-weight back squats and hip thrusts.
They found that the hip thrust caused significantly greater (172 percent vs. 89 percent) peak upper glute and peak lower glute (216 percent vs 130 percent) EMG activity than the back squat.
Plus, peak biceps activity was also higher than in the back squat group (1).
As you can see, the hip thrust produces greater muscle activity in the glute muscles than the back squat – and even works your biceps better.
This is great news for everyone building strength in their glutes, whether for performance or aesthetic reasons.
[Related: The 19 Best Glute Exercises of All Time]
Don’t Stop At The Glutes
You might assume the benefits of the glute bridge would stop at, well, the glutes. But when you look at the role the glutes play in any exercise that requires power, you’ll see that its effects go much farther than our backside.
This is due to what is called transference of force, or leg drive, which is when we use lower body power to perform upper body exercises.
Take, for example, the chest press. Sometimes when lifters go heavy for a chest press, you’ll notice their back arching off the bench as they attempt to push through their legs and back to help them lift the weight.
The problem with this is that when the glutes, lower body, and low back are underdeveloped and weak, you can become susceptible to overarching during the press. This can lead to hyperextension and low back pain.
On the other hand, if your glutes and backside are strong, your glutes will fire correctly and your low back will have sufficient stabilization to avoid overarching, lending you the needed power to push through your heavy press.
More Power and Better Performance
This increase in leg drive and the fact that the hip thrust helps strengthen the stabilizer muscles we spoke of earlier, helps with other types of movement, too.
This is especially true when it comes to sports.
For instance, glute strength can make a huge difference in sprint speed and horizontal jump distance, with studies showing the hip thrust increases sprint times (2).
We see this effect because most of our power for movement is driven through our lower body. So, any exercise that increases muscle activation in this area has the potential to help in explosive movements like those found in many sports.
Hip Thrust vs. the Glute Bridge
The main difference between the glute bridge and the hip thrust is the fact that the hip thrust is weighted.
This leads to greater muscle growth and glute activation, prepping you for other heavier lifts like squats and deadlifts.
The bridge is also traditionally performed with your back flat on the floor, while the hip thrust involves placing your upper back on a low bench. This can also allow for a greater range of motion through the hips.
How to do the Hip Thrust With A Barbell
For this exercise, make sure you use a bench or box that won’t move as you brace against it. Also, use a barbell weight that’s challenging for you, yet doesn’t compromise your form to the point where you’re using your lower back to complete the thrust.
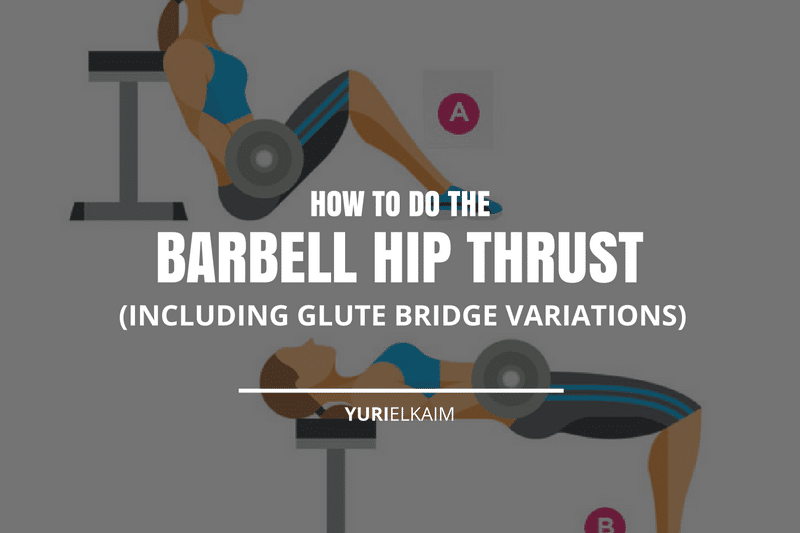
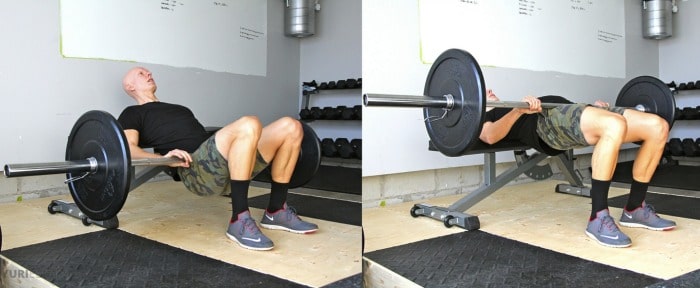
Performing Hip Thrusts With A Barbell
- Begin by putting padding around your barbell to prevent it from digging into your hips when you thrust.
- Place your upper back on your bench with your barbell across your hips. Position your shoulder blades against the bench.
- Keep your feet planted firmly on the ground, close to your glutes.
- Drive your hips skyward, engaging your core and abs.
- Keep the movement in the lower body as much as possible (don’t “rock” your upper body to complete the move.
- Do it slow and controlled, pausing for at least one second at the top, and focus on squeezing your glutes before lowering to your starting position. This increases the time under tension, ensures proper form, and full hip extension, and focuses the effort on the glutes rather than the lower back.
- Repeat for 8 to 10 reps.
Tip: Avoid hyperextending the lower back. To find your ideal foot position, your shins should be perpendicular to the floor at the top of the movement. This position optimizes glute involvement. Experiment with different distances from your butt—too close increases quad stress, and too far shifts the load to your hamstrings. Complete the full range of motion to fully benefit from this exercise.
How to Do the Barbell Hip Thrust Using the Smith Machine
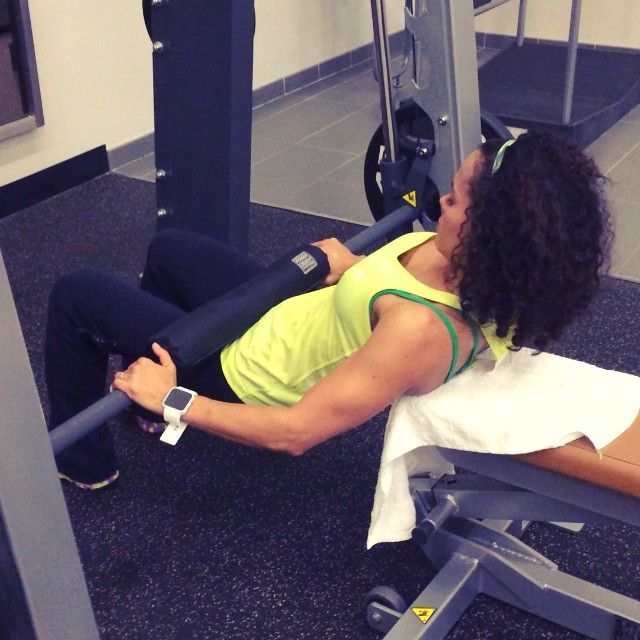
Performing hip thrusts on the smith machine is similar to hip thrusting with a standard barbell. The only real difference is that the barbell is supported in place by the smith machine.
This can come in handy when you’re slowly upping your weight and want additional support during the movement.
Performing Hip Thrusts With The Smith Machine
- Begin by putting padding around the barbell to prevent it from digging into your hips when you thrust.
- Place your upper back on a bench not quite under the smith barbell on the smith machine.
- Place the racked barbell across your hips.
- Keep your feet planted firmly on the ground, close to your glutes.
- Drive your hips skyward, engaging your core and abs.
- Hold for a count then lower to your starting position.
- Rack the barbell and repeat for 8 to 10 reps.
Other Variations
Don’t feel as if a barbell is your only option when it comes to hip thrusts. You can also hold a dumbbell placed across your lap, a weight plate, or even use straps.
Just make sure these weights are in the center of your hips to avoid imbalances. I also recommend to progress to a barbell once you start to need heavier weight, as it distributes weight better and can be padded to protect your hip flexors.
Glute Bridges
The glute bridge is still an excellent alternative to the barbell hip thrust, especially if you’re a beginner or are just returning to weighted workouts after an injury.
The glute bridge works several of the same muscle groups (the glutes, hamstrings, lower back, core), and also preps your stabilizer muscles to support heavier weight in the same position.
These muscles are found throughout the entire core and work to keep the spine in proper alignment, maintain our posture, and help prevent low back pain and injury, so they’re definitely worth your attention before jumping into a full hip thrust.
The good news is you can also progressively increase the difficulty of the glute bridge until you feel strong and stable enough.
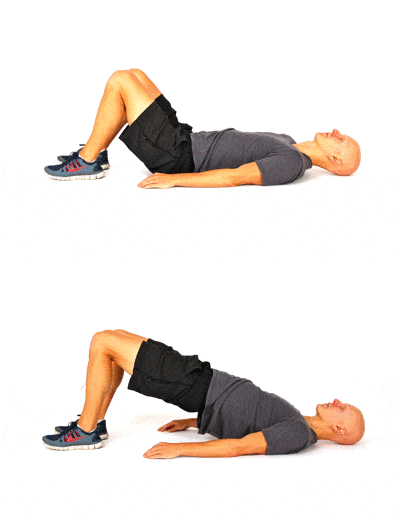
1. Standard Glute Bridge
- Begin on your back with your knees bent and your feet flat on the floor.
- Engaging your glutes, lift your hips fully toward the sky. There should be a straight line from your knees to your shoulders at the height of the movement.
- Hold for three seconds at the top, then lower. Repeat for 10 to 15 reps.
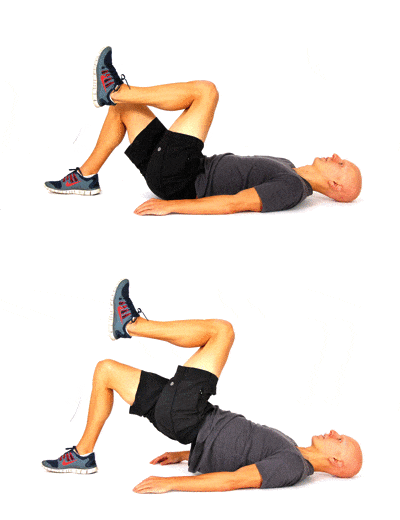
2. Single-Leg Bridge
- Begin lying face up on the floor, legs bent at a 90-degree angle to the floor.
- Push up into a standard bridge, then raise one leg off the floor. You can either keep it parallel to the floor or lift it straight into the air.
- Slowly lower until you’re almost touching the floor, then thrust your hips back up, keeping your leg extended, weight in your heels.
- Pause for a count at the top.
- Repeat on both legs for 10 to 15 reps.
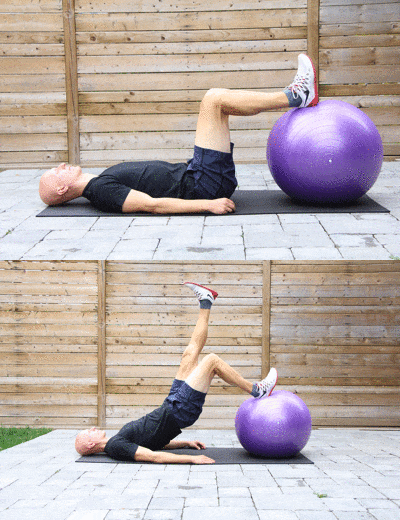
3. Single-Leg Elevated Bridge
- Begin lying on the floor, with your heels propped up on a bench or box.
- Lift one leg in the air, keeping the other on the box and bent at a 90-degree angle.
- Drive your glutes skyward through your heel. Be sure to keep your glutes and core tight and your leg extended throughout the movement.
- Lower until just off the ground, then repeat for 10 to 15 reps on each leg.
Strong Glutes, Strong Body
One thing is for certain: there’s almost no one out there that would turn down stronger, tighter glutes. Now if you actually have tight glutes, try these stretches to loosen them up.
The barbell hip thrust is an all-around spectacular exercise to help get you there, while also increasing your power during other movements.
FREE Fat Burning Workout
Blast fat with this new strength and interval cardio combo workout that does double duty by also sculpting your muscles.
This FREE download includes an instructional video, workout tracker, and follow-along audio. It’s a $29 value – and it’s my gift to YOU!
Click the banner below to get the Fat Blaster Workout now!

