While “wheeling your way to ripped abs” sounds suspiciously like an infomercial trap, I can assure you it’s anything but. That’s because using an ab wheel will help you perform some of the most challenging core exercises in existence.
What makes the ab wheel so effective is its ability to engage our entire core, including what is referred to as our “stabilizer” muscles. Stabilizer muscles act as the support system for our skeleton, aiding us in maintaining balance and correct posture. They are especially important when we talk about our “core,” as many believe the core only consists of our visible abdominals.
Below I’ve listed some of the best ab wheel exercises to get your core in tight shape.
11 Best Ab Wheel Exercises
Let’s get started with some ab roller exercises that will tighten your core like no other. We’ll begin with the most basic moves, progressing to advanced variations.
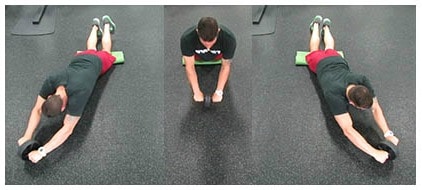
1. Ab Wheel Plank
The ab wheel plank is one of the best ab wheel exercises for beginners because it strengthens those essential stability muscles we spoke of earlier. It will also give you a feel for how to grasp the roller while maintaining your balance.
Absolute beginners should start here before attempting more advanced roll-outs.
How to do it:
- Begin on all fours in front of your roller.
- Grasp the handles of the roller with both hands, one on each side of the wheel, palms facing down.
- Push your torso up into a plank position with your body in a single straight line from head to heels.
- Engage your core and hold for 30 to 60 seconds.
- Repeat 3 to 4 times.
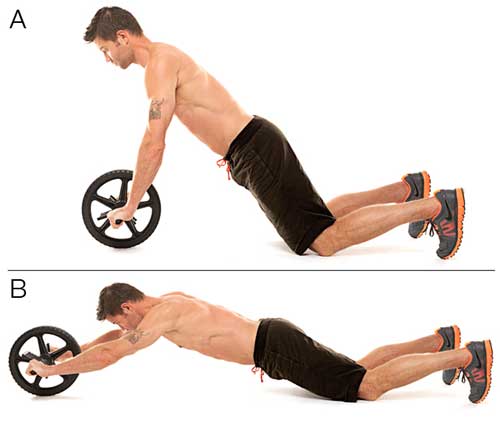
2. Knee Roll-Out
The knee roll-out is the next progression from the ab wheel plank.
Try to roll out as far as possible here without arching your back, ideally lowering your torso to just above the ground. If you’re not able to do this, try lowering it only halfway.
You may also want to use a pad under your knees.
How to do it:
- Begin kneeling on the floor.
- Grasp the handles of your wheel with your arms extended.
- Engage your abs and slowly roll forward until your belly is just above the floor, keeping your arms extended in front of you.
- Return to starting position by rolling back into your knees.
- Repeat for 5 to 10 reps.
3. Wide-Stance Front Roll-Out
The wide stance roll-out is slightly easier than performing the full roll-out with your feet together. As you progress, narrow your stance until you can complete the front roll-out below.
How to do it:
- Begin standing with your feet wider than hip-width apart, wheel on the floor in front of you.
- Bend at your waist and grasp the handles.
- Keeping your back straight and arms extended, roll forward until your arms are over your head and your body is just above the ground in a straight line.
- Roll the wheel back toward your feet, bending again at the waist to return to your starting position.
- Repeat for 5 to 10 reps.
4. Narrow-Stance Front Roll-Out
Once you’re able to roll out fully on your knees and can also do the wide-stance front roll-out, you can progress to full roll-outs. You’ll notice that these engage your entire body, engaging your arms, back, and shoulders almost as much as your abs.
How to do it:
- Begin standing with your feet together, wheel on the floor in front of you.
- Bend at your waist and grasp the handles.
- Keeping your back straight and arms extended, roll forward until your arms are over your head and your body is just above the ground in a straight line.
- Roll the wheel back toward your feet, bending again at the waist to return to your starting position.
- Repeat for 5 to 10 reps.
5. V Roll-Outs
V roll-outs are similar to knee roll-outs, yet put a greater emphasis on the obliques.
How to do it:
- Begin kneeling, grasping the handles of your roller.
- Keeping your arms extended, roll out slowly to your right at about a 45-degree angle.
- Return to your starting position, then roll slowly at an angle to your left.
- Repeat, alternating sides, for 5 to 10 reps.
6. Knee Tucks
Knee tucks involve rolling out with your feet, rather than your hands. This is excellent for engaging the lower abdominals and stabilizer muscles in the obliques, arms, and shoulders.
Note that you will need an ab roller with a foot strap attachment for this exercise.
How to do it:
- Once your feet are secure in the foot attachments, set yourself up in a plank position. Keep your hands directly under your shoulders and back straight.
- Now roll in the wheel by bringing both knees toward your chest, keeping your upper body and back in place.
- Extend your knees until you’ve returned to a plank position.
- Repeat for 8 to 12 reps.
7. Plank to Pike
The plank to pike is similar to the knee tuck, but instead requires you to keep your legs straight throughout the roll.
How to do it:
- Once your feet are secure in the foot attachments, set yourself up in a plank position. Keep your hands directly under your shoulders and back straight.
- Engage your core and slowly roll the wheel toward your upper body.
- Bend from your hips, picking your glutes toward the sky.
- Extend your body back to your starting position.
- Repeat for 8 to 12 reps.
8. Oblique Tuck
This version of the knee tuck deeply engages the oblique and stabilizer muscles.
How to do it:
- Once your feet are secure in the foot attachments, set yourself up in a plank position. Keep your hands directly under your shoulders and back straight.
- Now roll in the wheel by bringing both knees toward your right elbow.
- Extend back into a plank, then roll in toward your left elbow.
- Keep your upper body and back in a straight line at all times.
- Repeat for 8 to 12 reps.
9. Single-Arm Roll-Out
The single-arm roll-out is an extremely challenging version of the full-front roll-out. Here your rolling arm is challenged with supporting your full body weight, while your stabilizer muscles work overtime to keep you upright.
You can work up to the full version of this roll-out by practicing it on your knees first.
How to do it:
- Begin standing (or kneeling, if you’re practicing on your knees) with your roller on the ground in front of you.
- Bend at your waist and grasp the roller with one hand.
- Begin to roll out slowly, really focusing on engaging your core so you don’t tip over to one side.
- Congratulate yourself on truly having abs of steel!
10. Bridge Hold
Note: in this video demonstration he is NOT holding the bridge position.
The bridge hold works the stabilizer muscles throughout the core and lower body, as well as the glutes.
How to do it:
- Begin on your back, feet strapped into the foot attachments.
- Push your hips toward the sky, bringing your roller in toward your glutes. Make sure it’s in close enough so you can push down with your feet and it doesn’t roll away.
- Squeeze your glutes and raise them as high as you can, keeping your abs braced the entire time.
- Hold for 20 to 30 seconds.
Beginners should start by practicing the bridge on the floor if holding the roller in place is too difficult.
11. One-Leg Roll-Out
The one-leg roll-out is another challenging variation of the front roll-out, requiring significant stabilizer muscle strength.
Try this exercise once you’ve mastered the full front roll-out and oblique roll-out.
How to do it:
- Begin standing with your feet together, wheel on the floor in front of you.
- Bend at your waist and grasp the handles.
- Keeping your back straight and arms extended, begin to roll forward.
- Lift one leg, extended straight, as you roll forward fully.
- Roll the wheel back toward your feet (remaining on one leg), bending again at the waist to return to your starting position.
- Repeat for 5 to 10 reps.
Abs of Steel Circuit
Now that you’ve been introduced to some of the most killer ab exercises ever, let’s take a look at how we can integrate them into a fat-burning interval circuit.
This circuit combines ab roller exercises into an interval-style workout, which is great for burning off the fat covering our ripped core.
Beginners: Perform the roll-out exercises on your knees or with a wide stance. Make sure to maintain proper form and avoid arching your back at all times.
Advanced: Try to lower yourself as close to the ground as possible (aka, brushing it with the tip of your nose). If you still need more of a challenge, substitute front roll-outs with one-leg or single-arm roll-outs and nix the rest intervals.
The Ab Wheel Circuit
- 30 to 45 seconds jump rope
- 10 seconds rest
- 5 to 10 reps front roll-outs
- 10 seconds rest
- 5 to 10 reps V roll-outs
- 10 seconds rest
- 30 to 45 seconds jump rope
- 10 seconds rest
- 8 to 12 reps plank to pike
- 10 seconds rest
- 8 to 12 reps oblique tuck
- 10 seconds rest
Repeat this circuit 2 to 3 times. Feel free to switch up which roller exercises you use for your intervals.
What Are the Benefits of Ab Wheel Exercises?
In truth, our core includes layers of stabilizer muscles beneath our abdominals. These run around our entire torso, including along our sides and lower back. When strengthened, they act like a corset of muscle pulling everything in.
This is where the ab wheel makes its debut. Working with a roller targets these muscles along with the abdominals – the perfect recipe for a tight and toned core.
In fact, studies have found the ab roller to be superior to multiple popular “ab” workouts like the crunch. For instance, researchers at California State University discovered that muscle activity was significantly higher in participants performing exercises with an ab wheel as compared to traditional ab exercises (1).
How to Use the Ab Wheel Safely for Exercises
Because using the ab wheel can be challenging, here are some key safety points to keep in mind when doing the exercises above.
• Avoid arching your lower back as you roll out. You can tell if this is happening if you begin to feel a slight pinching in your lower back. This can be avoided by shortening your roll and/or doing the roll on your knees while pulling in your lower abs.
• Keep your head down in a neutral position with your chin slightly tucked during the roll. This will help protect your lower back and neck.
Beginner and Advanced Variations:
Many ab wheel roll-out exercises are very challenging for beginners. This is because it takes time to build a solid core foundation capable of supporting our full body weight when we do a roll-out.
Beginners will want to start by doing simple ab wheel planks (the first exercise above) until they feel ready to advance to the knee roll-out, and then finally full roll-outs and other advanced variations.
If you feel your form slipping at any time during roll-outs (such as arching your back), lower the intensity by dropping to your knees.
The Fast Way to A Toned Tummy with Ab Rollers
With these exercises, you’ll be able to say good riddance to ineffective, traditional ab exercises like the crunch and start rolling toward a lean and toned core.
Get a Stronger Core
Want to learn even more about creating hard abs and a tight core?
You’ll definitely want my FREE Abs Secret download, which outlines 7 smarter ways to have a flat, lean belly.
You can get the secret blueprint for losing belly fat and sculpting your core – FREE! – right now by clicking the banner below.